Repair Windows System Files Using SFC
Windows System File Checker (SFC) tool can be used to check the System Files for errors or corruption and fix them. SFC basically scans the integrity of system files on your computer and automatically replaces them with correct version files, in case they are found to be missing, corrupted, damaged or changed. You can use the SFC tool, if your computer is crashing, generating error messages and going through problems.
Steps to Repair Windows System Files Using SFC
Follow the steps below to run SFC command to repair corrupted or damaged Windows System Files.
- Right Click on the Start button and select Command Prompt (Admin).
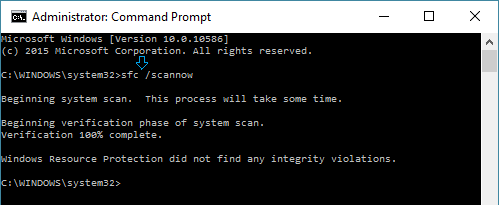
- On the Command Prompt window, type sfc /scannow and press the Enter Key on the keyboard of your computer.
Note: There should be a space after sfc. 3. Patiently wait for Windows 10 to scan your computer for System File Errors and fix them. It may take anywhere from 10 to 20 minutes for the full system scan to be completed. Once the SFC scan is completed it will come up with one of the following results.
Windows Resource Protection did not find any integrity violations (which is a good result) Windows Resource Protection found corrupt files and repaired them (better than good!) Windows Resource Protection found corrupt files but was unable to fix some (or all) of them (not a good result)
In case you get the third message, you need to take the help of DISM tool to fix the problem.
Repair Windows System Files Using DISM
Microsoft defines DISM (Deployment Image Servicing and Management) as a command-line tool that combines separate Windows platform technologies into a single, cohesive tool for servicing Windows images. DISM is generally used when the System File Checker (SFC) is unable to fix problems on a computer. DISM tool has the capability to fix Component Store Corruption that is known to prevent SFC Scan from functioning properly on a computer.
Steps to Repair System Files Using DISM
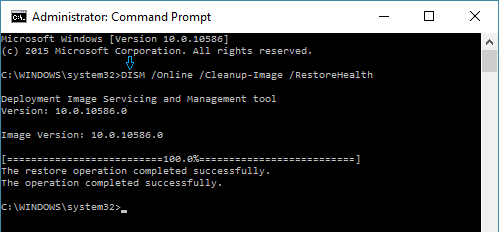
- Right-click on the Start button and click on Command Prompt(admin).
- On the command prompt window, type DISM /Online /Cleanup-Image /RestoreHealth and press the Enter Key.
Note: There needs to be a space after DISM, Online and Cleanup-Image. 3. Wait for the DISM tool to check your computer for errors and fix them. The DISM process may take anywhere from 10 to 15 minutes or more. Also, the progress bar may not show up for a while and you may find the progress stuck at 20 percent for a long time. After the DISM command has finished running, restart your computer and run the SFC command once again to replace remaining corrupted files (if any) with the correct ones.
How to Start Windows 10 in Safe Mode How to Create Windows 10 Recovery Drive