Error 0x80070002 in Windows 10
While Error Code 0x80070002 is mostly related to failing Windows 10 update, it can also occur while using Microsoft Store and upgrading to Windows 10 from on older version. In this error is related to Windows update, it can be fixed most of the times by running Windows Update Troubleshooter on your computer. If this does not help, the problem could be due to incorrect Date & Time settings, corrupted system files or a glitch in Windows Update service.
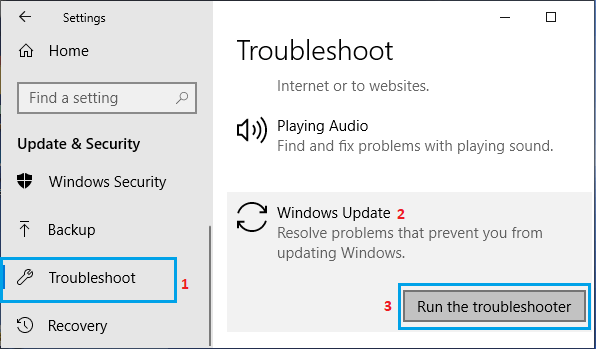
1. Run Windows Update Troubleshooter
If the problem is occurring while installing Windows update, you can trust the Windows Update Troubleshooter to fix this problem on your computer. 1. Go to Settings > Update & Security. 2. On the next screen, click on Troubleshoot in the left pane. In the right-pane, scroll down and click on Windows Update > Run Troubleshooter.
- If prompted, enter your Admin Password and wait for Windows to find and fix problems related to Windows Update on your computer.
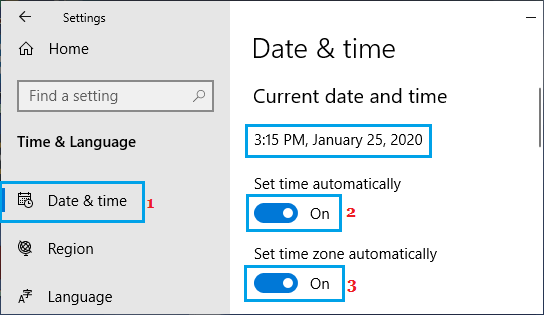
2. Check Date & Time Settings
The Date & Time Settings on your computer need to be correct in order to receive timely Windows updates.
Go to Settings > Time & Language. 2.On the next screen, click on Date & Time in the left pane. In the right-pane, toggle on Set Time Automatically and Set Time Zone Automatically options.
Similarly, click on Region and make sure the Country & Region settings are correct.
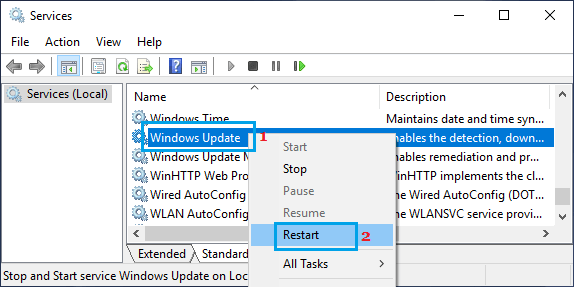
3. Restart Windows Update Service
Sometimes, the problem could be due to Windows update service getting get stuck or becoming glitchy
Press Windows + R keys to bring up the Run Command.
In the Run Command Window, type services.msc and click on OK.
On the services screen, right-click on Windows Update and click on Restart option.
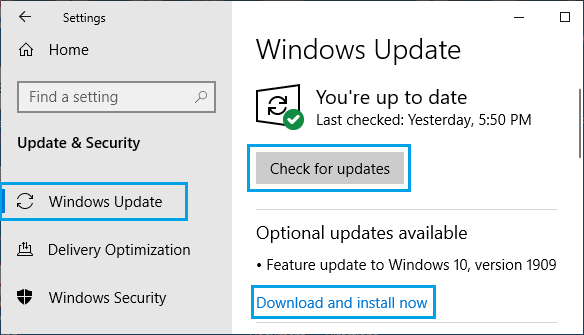
After this, install Windows update on your computer by going to Settings > Update & Security > Windows Update > Check For Updates or click on Download and Install (if updates are available).
4. Run System File Checker
As mentioned above, Windows Update Error Code 0x80070002 can also be caused by corrupted system files.
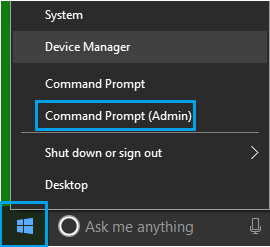
Right-click on the Start button and click on Command Prompt Admin
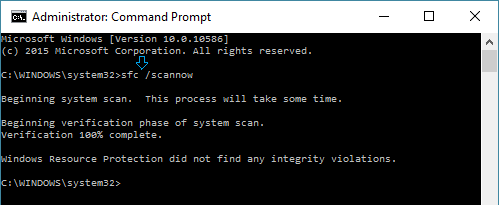
In the Command Prompt window, type sfc /scannow and press the Enter key.
Wait for Windows to check corrupted files on your computer. In case any errors are detected, you can use the DISM command to repair corrupted system files on your computer.
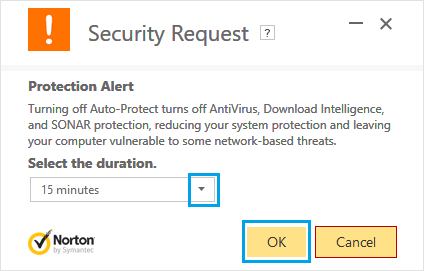
5. Disable Antivirus Program
If you are seeing ‘Application was unable start correctly’ error message on your computer, try disabling the third-party Antivirus program on your computer.
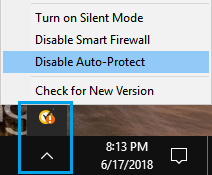
- Right-click on the Antivirus Program icon located in the taskbar and click on Disable Auto Protect.
Note: Open System Tray, if the Antivirus program Icon is not available on the Taskbar 2. On the next screen, select a temporary Time Period and click on OK.
After disabling Antivirus program, see if you are still getting “Application was Unable to Start Correctly” error message on your computer. If you are using Windows Defender, disable Windows Defender for a temporary period. Note: Make sure that you re-enable Windows Defender or the Third-party antivirus program back on your computer.
How to View Installed Updates in Windows 10 How to Uninstall Windows 10 Update